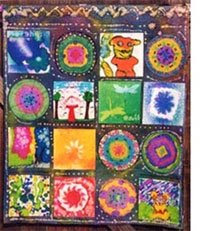
Back by Popular Demand - Paper Quilts with NEW WRITTEN Instructions!
 Hello to all who have enjoyed seeing the paper quilt on the Art & Creativity Blog. Thank you for your interest!
Please find the written lesson plan below.
All materials available through Discount School Supply.
Paper Quilt Materials:
• Colorations® Liquid Watercolors – at least 6 colors
• Bingo bottle applicators
• Spray bottle applicators
• Small Coffee Filters
• Cooperative Mural Art Mat – Qty: 2
• Colored markers for quilt square details
• Fine line Sharpie type marker for name identification
Assembly Materials:
• 2 dowels, one for top and one for bottom
• Glue or Low Temp Hot Glue Gun
• Cord for hanging
• Beads for hanging (optional)
Preparation:
1) Select coffee filters, one per child (8" is what I used)
2) Cut Mural Art Paper (LWMAT) into 8" squares, or to match coffee filter size. If you want to tuck under borders, add 1" all around for fold/tuck/mounting. Or, cut to 8” and glue down directly w/out worrying about having the border fold be so neat. To cut: unfold LWMAT a few times but do not open up completely. Create a template out of cardstock w/your measurement. Use your template along w/an exacto blade or large scissors to cut several layers of LWMAT at once. It rolls up at the edges, but don’t worry as once painted it will relax and lay flat. If it rolls up while kids are painting it, tack it on the corners w/a small piece of masking paint.
Day One / Lesson One: Coffee Filter Art
Coffee Filters – Follow Salt Crystal Filter lesson plan. Since coffee filters are so cheap, children can paint two or more coffee filters arts and select their favorite, or use them to make additional quilts. Each child uses thin Sharpie type permanent marker to add small name or initials.
Day Two / Lesson Two: Painted Squares
Quilt Squares, on LWMAT material.
Use bingo bottles to create a design, adding details w/colored markers. The quilt from the blog was made by 3rd graders and we had the class of 20 decide on a theme – the chose "Animals" for the squares. The animal theme unified this quilt and gave it character. (The coffee filters portions of the quilt had no theme, since they were abstract color designs).
Day Three / Lesson Three: Color Spray Mural
This third lesson you can do on your own or have the children join you with. I ran out of time, so I did this myself. But on other occasions I’ve had groups create Color Spray Murals and they are spectacular. What this part involves is making a background to mount the circles and squares. Not much of it will show, only the part in-between the circles and squares – so in some way it can be disappointing for children to create a Color Spray Mural and then have it mostly covered up. But this would at least get the accustomed to spraying Liquid Watercolor, and the next go round you could do Color Spray Murals and not mount anything on top.
Adult Homework: Quilt Assembly (allow at least 2 hours to assemble 2 paper quilts of the size you see in my photo. This is only an estimate and will vary depending on how quickly you work or if you have a helper)
1) First, lay out your Color Spray Mural and cut a section to size, trimming it at whatever size you want your finished quilt to hang. I used an exacto blade, steel ruler, and large cutting board which made it easy to measure off. Repeat to make more quilts…we made 4 quilts using 2 LWMAT’s. You have to count out your finished circles and squares and decide what dimensions you want, to determine how many quilts you’ll make.
2) Lay out your circles and squares evenly in a nice pattern on top of one color spray mural background. Leave 2-3 inches at top and bottom to fold over and place dowel. Heat a low temp glue gun, and then mount circles and squares in place. Lift up one at a time and glue down one at a time, to remember where placement goes for each piece. You can use tacky glue or white glue, or even spray mount. I found the low temp glue gun worked well and was quick. Repeat w/remaining materials to create more Paper Quilts.
Day Four: The Finishing Touches: Classroom Collaboration
I took the assembled paper quilts into the classroom to finish as a group. Some children painted the wooden dowels while others strung beads and cut cords. You’ll need to fold over and glue down the top and bottom of the quilt over the painted dowels. Once the glue is dry, hang the dowels from your beaded cords and hang to admire. Add painted touches of Colorations® Liquid Watercolor gold or silver metallic’s if you feel your quilt will benefit from a few final sparkling touches.
Our 3rd grade classrooms made 4 paper quilts, and we auctioned them at our school’s annual Fundraiser. We made a lot of money for our school and had a lot of fun in the process.


1 Comments:
I bookmarked this activity last year. As I'm preparing for the upcoming school year, I can see how it combines with our planned work in scale drawings, in which we intend to employ scaling quilt blocks for a classroom "quilt" of paper. (8th grade)
Thanks for your work, not just to use as is, but fot the input to take other concepts to the next level.
Post a Comment
<< Home